Better flight planning.
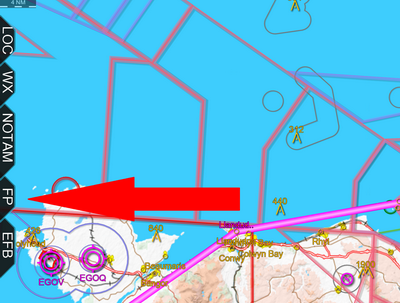
- To get started let’s create a simple Route between EGCK and EGPP via Llandudno and WAL, as described in the guide “Create a Route”.
- When you have created the Route, if the FlightPlan (FP) tab isn’t already open then open it by tapping on it.
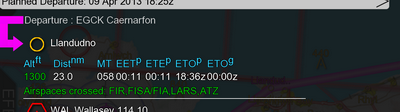
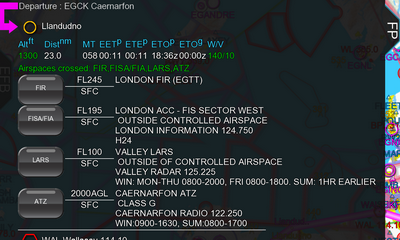
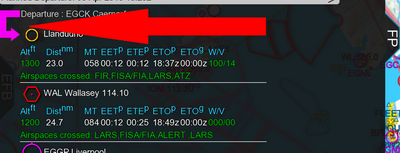
- About half way down the initial FP screen, below the grey buttons is an information panel giving details for each leg of your flight. There are various pieces of information about your planned route.
The first thing that you should know is that any text which is colored green can be tapped on. Each block of information relates to a single leg.
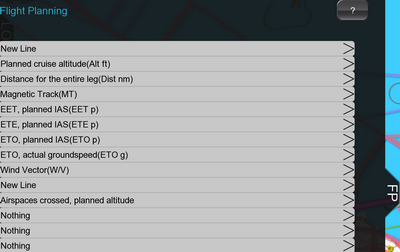
By default the information shown is:
| |
 |
The name of the location where the leg will end, |
| |
|
a symbol to indicate the type of object that the waypoint ends on, |
| |
|
The planned altitude for this leg, |
| |
|
The distance of this leg, |
| |
|
The magnetic track, |
| |
|
The (EET p) estimated enroute time for this leg (how long it will take to fly this leg) as estimated at planning time, |
| |
|
The (ETE p) estimated time elapsed at the end of this leg (total duration since the start of the flight) as estimated at planning time, |
| |
|
The (ETO p) estimated time overhead the point at the end of this leg, as estimated at planning time, |
| |
|
The (ETO g) estimated time over head the point at the end of this leg, based on current in flight speed as indicated by your GPS, |
| |
|
A list of all airspaces crossed on this leg. |
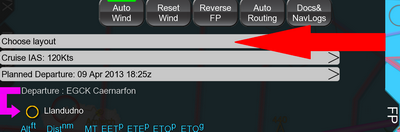
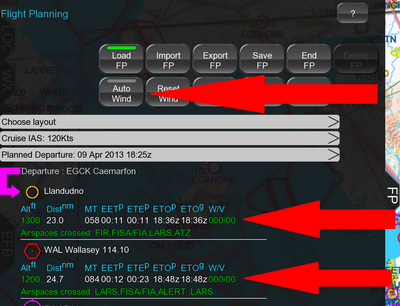
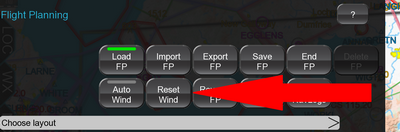
- These are the default options but EasyVFR allows you to customize these to your own liking. So let’s do that. Just above the first leg are three long grey controls. The first one is [Choose Layout]. Tap it.
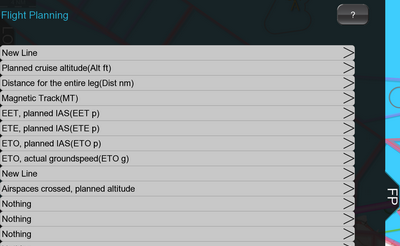
This brings up the layout setting, and shows the current design.
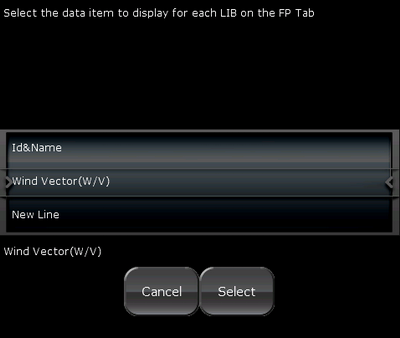
- Now we will adjust the current design to include the wind vector just after the block of time figures. To do this, tap the grey control that says [New line].
This brings up a drum selector that shows all the possible data fields that you can choose from.
- Roll the drum until “Wind Vector (w/v)” is shown, and wait a second for your selection to take effect. The words “Wind Vector (w/v)” will be shown just below the drum selector when it’s taken effect. Then press Select.
Now “Wind Vector (w/v)” appears in the layout design where “New Line” was previously.
- Of course the new line was used to nicely format the display of information because we wanted the "airspaces crossed" information to appear on a new line and not just after all the times. So if we want to keep this neat formatted layout we’ll have to make the appropriate changes.
To do this, tap the grey control [Airspaces crossed, planned altitude] and this time use the drum selector to select “New Line”, and then tap the Select button.
Now tap the grey control below this which currently says “Nothing”, and use the drum selector to select “Airspaces crossed, planned altitude” and select OK. Your screen should now look like this:
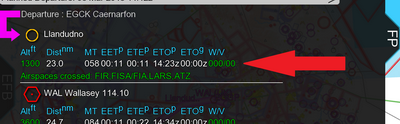
- Now tap the Back button to return to the flight planning screen. You will see that the wind vector has been added to the end of the row of times.
On smaller screen devices it may have been necessary to put this onto the next line as there was not sufficient space to show it. There are various different pieces of information that you can add to this screen or indeed remove to your own personal preference. Feel free to experiment!
If there is another piece of information that you’d like to have available as an option, then please join us on our forums and tell us!
- As previously mentioned any text which is colored green can be tapped on. As an example, tap on the green 000/00 wind vector in the first leg.
If the wind vector reads “na” instead of 000/00 it means that no wind data has been downloaded. To rectify this do the following:
- close the FlightPlan tab by tapping “FP”.
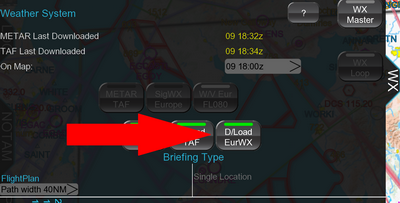
- Open the Weather tab by tapping WX.
- Tap the button D/Load EurWX to download weather data including winds aloft and wait for it to complete. It has completed when the button bar has turned green.
- Then tap the WX tab to close it again, and the FP tab to return to the FlightPlan tab.
- Tapping the green 000/00 will bring up a roll drum selector which you can roll up and down to manually set the wind direction and speed. Roll the selector up and down with your finger. Once you have selected the desired settings (making sure that the selector has stopped rolling), tap Select.
And the wind vector will now show the new setting:
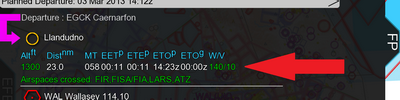
- On each leg, by default you’ll see the airspaces crossed on this leg. At present it shows simply the type or class of airspace that you are crossing along the leg, in the order that you'll enter them.
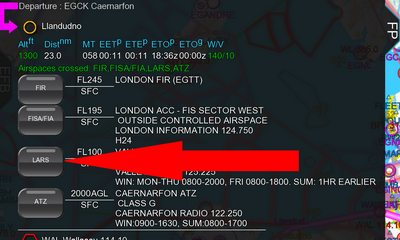
In this case we cross an FIR, a Flight Information Service Area, a LARS and an ATZ. You’ll notice that it’s colored green, which means that you can tap it. So go ahead and tap it. This reveals more detailed information about each of the airspaces crossed, including its vertical extent, its name, controlling authority and their call sign and frequency. There may also be some notes about activity times.
- When “airspaces crossed” section is expanded, to the left of each airspace there is a button containing the airspace type. If you tap this button, the map is adjusted to center on the airspace selected and the airspace is highlighted to show you exactly the piece of airspace that is being crossed. Tap one of them now to see the airspace highlighted.
When you’re done just tap the “FP” tab to reopen it. This makes understanding which piece of airspace you cross and where, extremely easy.
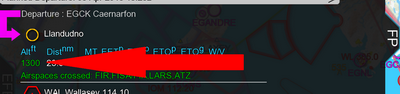
- You can change the altitude of any leg simply by tapping on the green altitude figures.
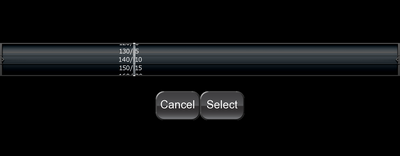
This brings up a dual drum selector. Roll the ‘thousands’ drum to the desired amount and the minor drum selector to the desired amount. For example if you wished to have this leg set to 2,500ft then roll the left drum to “2” and the right drum to “500”, wait a second for your selection to take place and then tap Select.
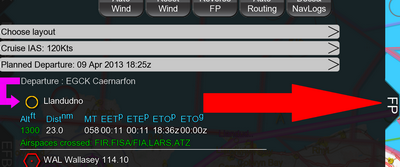
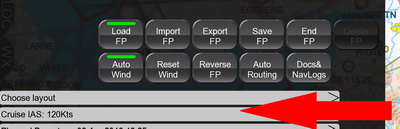
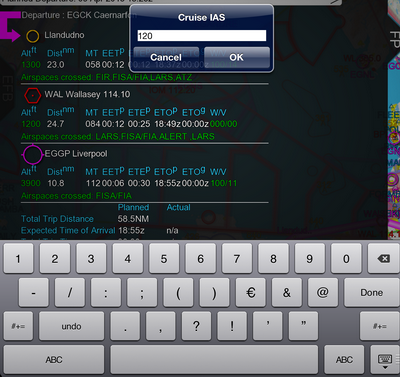
- Changing the flight speed is easy too. The middle grey button near the center of the initial screen which has the text “Cruise IAS:” and some numbers, is used for changing your airspeed. Tap it and this will bring up a box into which you can type your planned indicated airspeed.
On Android you need to tap into the box itself to bring up the keyboard.
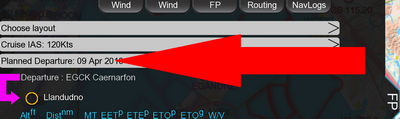
- Just below this box is a grey control with the text “Planned Departure” and a date.
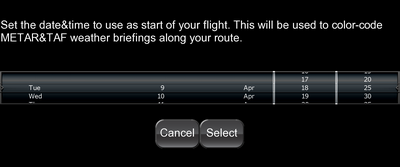
Tapping this brings up three drum selectors which allow you to set the date and time of your planned flight.
- Roll the first one to select the planned date of the take-off for the flight, the second one for the planned hour and the third for the planned minute.
- Then tap Select to confirm your selection.
- The date and time are used for a number of things in EasyVFR, including setting default parameters for NOTAM filters, and as we’ll discuss next, for the information at the end of the FlightPlan tab.
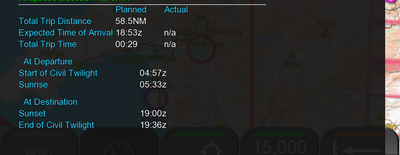
- If you now scroll to the end of the FlightPlan tab you’ll see a summary of your planned flights. This summary gives you some basic information such as total trip distance, expected time of arrival and total trip time.
In addition, based on the date of your flight, the start of civil twilight and sunrise at your point of departure is shown as well as sunset and the end of civil twilight at your destination making it easy to know when official night ends and begins.
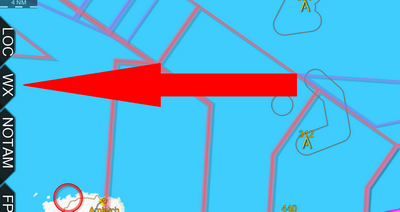
- You will also notice a big magenta arrow along the left hand side of the FlightPlan. This will point toward the leg in the FlightPlan that you are currently flying, helping you quickly find the information that you need..
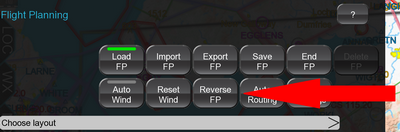
- Many of the buttons across the top are self explanatory however for some items an explanation may be useful.
If you have download weather data, then tapping Auto Wind will insert into each leg, the correct forecast wind aloft at the planned altitude for that leg.

Before pressing
Auto Wind:
After pressing
Auto Wind:
- If you have manually changed the wind vector (as explained how to do earlier in this guide) then the Reset Wind button will reset all the wind vectors to their default settings.
If the Auto Wind button is turned on, then using the Reset Wind function will return all the wind vectors to their forecast values.
If the Auto Wind button is turned off, then Reset Wind will return all wind vectors to that set for the first leg. This can be useful if you wish to manually set the wind for all legs. You can then simply set the first leg, and then tap Reset wind to have them all set to the same value.
- The Reverse FP button will reverse the FlightPlan, so that your destination now becomes your departure point, your departure point now becomes your destination, and the order of all the waypoint in between have been reversed.
- The Auto Routing and Docs & NavLogs buttons are subject to separate guides.
Having read this guide, you might also find the guides on the Vertical Profile View useful for vertical flight planning, the guide on Auto Routing useful for letting EasyVFR do the flight planning for you, and “Docs and NavLogs” useful for creating paper documents to bring with you on your flight.