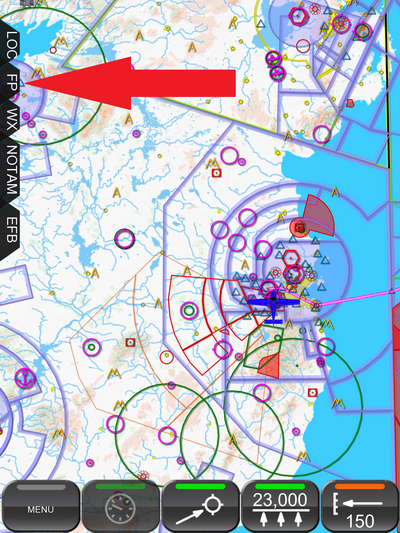
 |
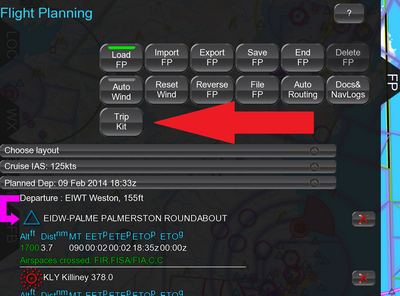
- Now the FP tab will open. Near the top you will see a series of buttons which control the FlightPlan. Tap the TripKit button.
 |
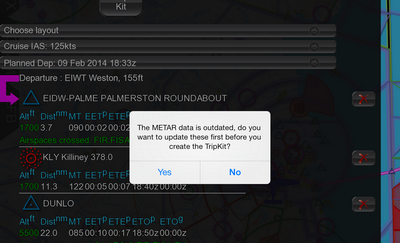
- If any of the weather or NOTAM data needed for your TripKit is out of date, you will be warned about it and invited to update it now.
 |
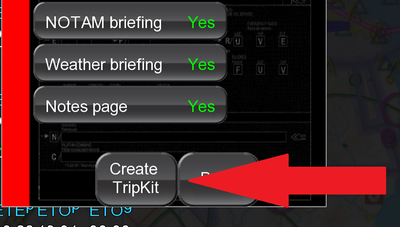
- Now you will see the TripKit setting window. This window allows you to choose which documents you want to be included in your TripKit. You can exclude a document from your TripKit simply by tapping it, and include it again by tapping it again.
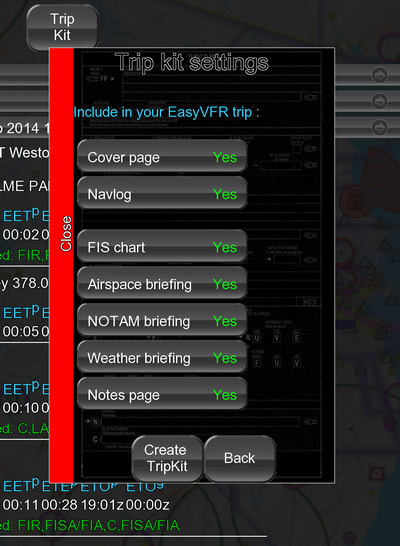 |
- If at any time you change your mind and wish to cancel the creation of the TripKit, you can close this window by simply tapping the red “Close” bar on the left, or the Back button at the bottom.
- Once you are happy with your document selection, tap the Create TripKit button.
 |
- There will now be a short pause while your TripKit is created.
- How you view the TripKit will depend on which device you are using.
- If your system does not allow the viewing of a PDF in EasyVFR, then the TripKit will be opened in your default PDF viewer. Printing of the TripKit will be handled by that viewer. If for some reason it does not appear, then make sure that you have a PDF viewer such as Adobe Reader installed.
- If your system does allow the viewing of a pdf in EasyVFR, then the TripKit will be shown on the FP tab.
- To print it, use the unique Easy Print feature of EasyVFR. Simply tap the Easy Print button at the bottom of the screen.
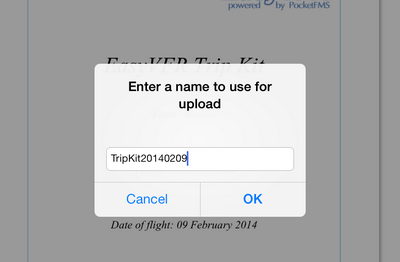
- When asked for a name, you can use any name you wish as long as you only use the standard ASCII letters (so without accents of any sort). This is what your document will be called when stored in the Cloud. For example you could use “TripKit20140209”, being “TripKit” followed by the date of flight.
 |
- The TripKit will now be uploaded to your private space on the PocketFMS Cloud. When the upload has completed you will be given a URL for the document in the Cloud.
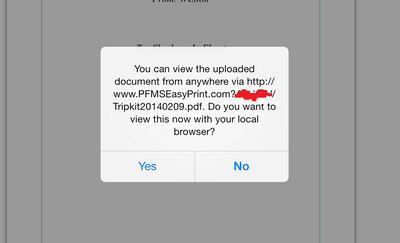 |
You can now load and print this TripKit from any computer connected to the internet. If you have facilities to print directly from your tablet, you can answer Yes to the question shown to open it in your browser. You can print it from there.
TripKit Documents.
The TripKit contains a number of documents - here is a short description of each:
The Cover Page is simply a cover page for your TripKit, with the details of the flight to which the briefing relates.
The NavLog is an advanced inflight log which contains all the essential info for your planned route. It contains details of the frequencies and elevation of your departure and destination airports as well as distances and timings for each of the waypoints. If you have set a wind vector in the FP tab, then it will be taken into account here too.
The FIS Chart is a convenient chart which shows you the outline and frequencies of the various different Flight Information Service units along your route.
The Airspace Briefing shows all the frequencies that you are likely to need. Frequencies attached to your departure and destination airports are shown at the start. Then below this is a list of all the airspaces which you will cross along your route, together with their frequencies, Class and vertical extent. These are shown in the order that you will encounter them, and include the estimated time from take-off that you will encounter each one.
The NOTAM Briefing lists all the NOTAMs relevant to your flight. NOTAMs are listed using the same filter that you have set on the NOTAM tab. NOTAMs issued in the past 24 hours are listed first and are colored rusty red. NOTAMs which you have hidden are listed on the briefing for completeness, after a heading indicating that they were hidden. They are printed in italic. If you would like to learn more about filtering and hiding NOTAMs then please see the tutorial “A NOTAM Briefing in EasyVFR”.
The WX Briefing is the EasyVFR weather briefing. It consists of two distinct parts: the first part is a graphical briefing and the second a textual briefing. The graphical briefing gives you a map along your route and shows the METAR and TAFs along the way represented by colored circles. The colored circles represent the weather at that station in accordance with the legend listed at the top of the screen.
The circles consist of two distinct parts. The inner circle shows the weather at the time of planned takeoff and the outer circle shows the weather at the time of planned arrival at destination.
 |
In this example, the weather at time of planned departure is represented by the color blue, and at time of arrival by the color green. The key to the colors is given at the top of the page.
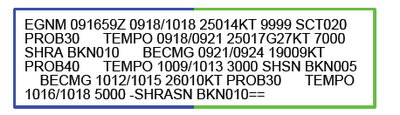
The textual part of the weather briefing lists METARs and TAFs along your route in textual format. Each METAR is outlined by a colored box. The color of the box is in accordance with the color scheme mentioned above.
Each TAF is outlined by a two colored box. The color of the left hand side of the box represents the weather at the time of planned departure in accordance with the scheme above, and the color of the right hand side represent the weather at time of planned arrival.
 |
In this example, the weather at the time of planned take off is blue and planned arrival is green. Note that if a METAR is available for the time of departure it will be used to determine the color for departure time.
The Weight & Balance briefing holds a report, including a graph, of your aircraft's current load status.
The Notes Page gives a handy page for taking inflight notes and is ruled to help provide some structure for your notes.
As you can see, the EasyVFR TripKit provides a handy collection of flight briefing documents in one easy to print booklet. EasyVFR, making your flight planning Easy!
