 Of course you can reset the hidden NOTAMs at any time, and EasyVFR will tell you how many NOTAMs you have hidden at any time.
 NOTAM briefing explained.
Despite the power of the system, completing a NOTAM briefing is very easy. Here is a simple guide to doing a NOTAM briefing.
- Start EasyVFR.
- Tap the tab on the left that says “NOTAM” to open the NOTAM tab.
 |
- Firstly you must download NOTAM data. If you are connected to a wifi network and have the “NOTAM Master” switch turned on, then EasyVFR will automatically start a NOTAM download for you when the app starts.
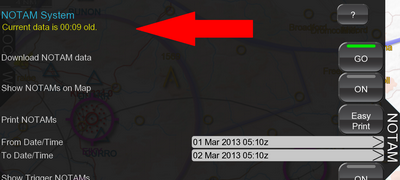 |
Check the time in the top left, it shows how long ago your last NOTAM data was downloaded. If your NOTAM data needs to be updated tap the GO button to the right of [Download NOTAM data]. This will take a few minutes to complete as all NOTAM data will be downloaded. If you later change your route in flight you don’t need an internet connection to re-brief.
- Leave [Show NOTAMs on Map] turned off until you’ve completed your briefing. There is likely to be too many NOTAMs available at this stage to be useful on the map, as you have not eliminated any yet.
- Once the download has completed we need to do some gross filtering to eliminate the bulk of the non-relevant NOTAMs.
The first two to set are the From and To date and time. This restricts your NOTAM briefing to NOTAMs that are relevant to the time interval between the From and To time. NOTAMs that have no relevance to this period will not be shown. For example an aerobatics display which will be completed before your “From” time will not be shown as it is not relevant to your flight.
If you have a FlightPlan loaded, this will automatically be set to two hours before your planned departure time to allow a safety margin for change of plans, but you can adjust this to your own liking. The “To” time works in a similar way and if you have a FlightPlan loaded is by default set to four hours after your planned arrival time.
To change these, simply tap the date and time that you wish to change. This will bring up a drum selector:
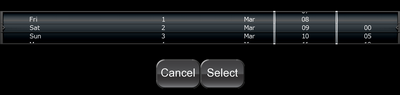 |
You can roll these up and down with your finger to select the date and hour and minute of your choosing. Either accept the default From and To times or change them to your liking.
- The next filter to set is if you want to show trigger NOTAMs.
Trigger NOTAMs tend to affect wide areas, perhaps a whole FIR or whole country. They tend to be administrative in type and for example might indicate that a new AIRAC date has passed and a new AIP update has become effective. If you deem these not relevant to your flight you can turn off their display by ensuring that [Show Trigger NOTAMs] does not have the green bar light lit.
- The next filter to consider is FIR-wide NOTAMs.
Some NOTAMs are so general in nature that they affect a whole FIR. These could for example be that a new VFR chart has been published by the National Authority and is available for purchase, or that there is a danger of ash cloud contamination covering the whole FIR. If you deem these not relevant to your flight you can turn off their display by ensuring that [Show FIR-wide NOTAMs] does not have a green bar light.
- The next gross filter is Aerodrome NOTAMs.
NOTAMs may be either designated “Enroute” or “Aerodrome”. Some NOTAMs are both “Enroute” and “Aerodrome” designated. “Enroute” NOTAMs are those that affect aircraft in flight but not landing at that particular aerodrome. Examples of these would be temporary restricted airspace or an aerobatic display.
“Aerodrome” NOTAMs are those which only affect aircraft that are landing or taking off at that aerodrome. Examples might be a change in opening hours, changes in the availability of fuel at the aerodrome or a closed taxiway. EasyVFR will always show “Enroute” NOTAMs and if you have a FlightPlan loaded EasyVFR will always show “Aerodrome” NOTAMs for your airport of departure and destination.
If you are considering landing at other aerodromes along your route other than the destination in your FlightPlan you might wish to show “aerodrome” NOTAMs for all airports along your route. If you wish to show these for all airports, not just your departure and destination airports then ensure that the [Show Aerodrome NOTAMs] is turned on which is indicated by a green light bar. Be warned though that this will increase the number of NOTAMs to brief significantly and you might want to consider doing individual FlightPlans to each of your possible destinations instead.
- The final gross filter relates to the briefing area.
 |
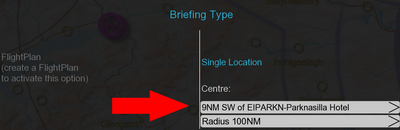
There are two types of briefing: FlightPlan briefing and Single Location briefing. If you have a FlightPlan loaded then your briefing type will be FlightPlan briefing type. Otherwise your briefing will be for single location briefing type.
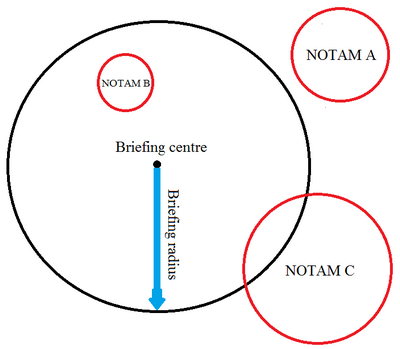
With a flight plan briefing, a corridor is created around a given distance centered on your route. Any NOTAM that has an effect inside that corridor will be shown in your briefing. Example:
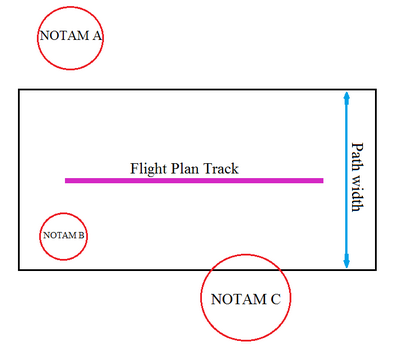 |
In this example a corridor is drawn in black around the flight plan line. Any NOTAMs intersecting this corridor will be included in the briefing. In this case NOTAM A will be excluded as it does not affect the area inside the corridor. NOTAM B will be included as it is entirely affecting airspace inside the corridor. NOTAM C is centered outside the corridor but the area that it influences (or is required briefing for) extends partially inside the corridor, so it will be included in your briefing.
If you have a FlightPlan loaded, you can change the corridor width by tapping the grey [Path width] control. This brings up a roll drum selector which you can change by sliding up and down. When set on the desired width press Select.
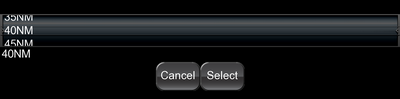 |
By default the path width is set to 40NM which is 20NM either side of the center. With a Single Location briefing a circle is created around a given location (by default the nearest airfield to your present position) of a set radius. Any NOTAM that has an effect inside that circle will be shown in your briefing. Example:
 |
In this example a circle is drawn in black around the selected central location. Any NOTAMs intersecting this circle will be included in the briefing. In this case NOTAM A will be excluded as it does not affect the area inside the circle. NOTAM B will be included as it is entirely affecting airspace inside the circle. NOTAM C is centered outside the briefing circle but the area that it influences (or is required briefing for) extends partially inside the circle, so it will be included in your briefing. To change the center of the circle, tap the grey box which currently shows the location being used.
 |
The NOTAM tab will be closed and you will be asked to tap the new center on the map. Tap on the map where you want the new center to be, and that will now be set and the location will appear in the grey button when the NOTAM tap slides open again.
You can also change the radius of the circle by tapping the grey control called [Radius xxxNM]. This brings up a roll drum selector which you can change by sliding up and down. When set on the desired width press Select.
- That is the end of the gross filters. Your briefing is now restricted to NOTAMs which are in the area defined, the time span defined and which meet your conditions set above. You are now ready to look at the individual NOTAMs.
- Scroll down to see the NOTAMs in your briefing. NOTAMs which have been released in the past 24 hours are listed at the start of the briefing and have their title colored red. Other NOTAMs have their title colored blue.
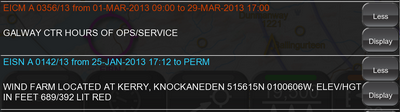 |
- Each NOTAM has two buttons beside it. One is marked Less and one is marked Display.
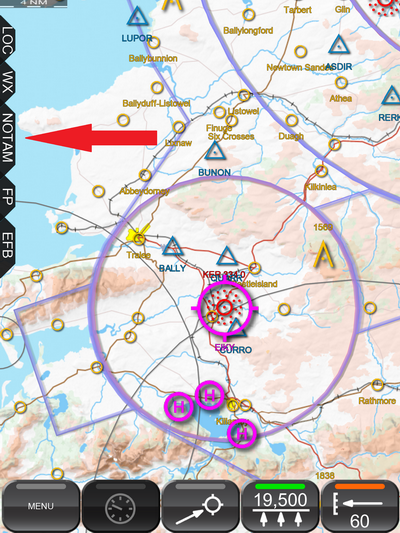
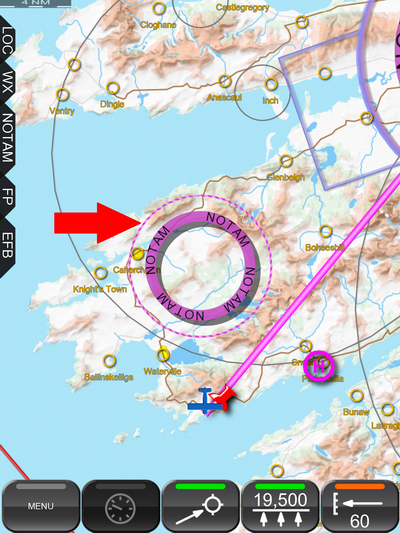
If you wish to see the location of the NOTAM on the map, tap the button marked Display. This will center the map on the NOTAM and highlight the boundary with a moving line for 60 seconds. When you are finished you can reopen the NOTAM tab by tapping on it, and it will open in the same position that you left off.
 |
- Having looked at the NOTAM you can now choose whether it is relevant to your flight or not. If the NOTAM is relevant to your flight you can compress it so that it only shows the first line so that it takes up less space or you can leave it full size. If you compress it you can easily expand it later for reading again.
| If you consider the NOTAM relevant and want to leave it fully displayed then you can just move on and read the next NOTAM. | ||
| If you consider the NOTAM relevant but you want to compress the NOTAM so that it takes up less space, then just tap the Less button. |
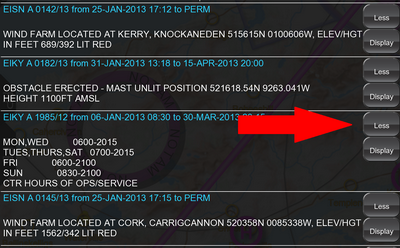 |
| If you consider the NOTAM irrelevant to your flight and want to hide it completely then you tap the Less button. This will compress the NOTAM to its first line and the Less button will change to Hide for five seconds. During this five second period while the button says Hide tap it and the NOTAM will be completely hidden. |
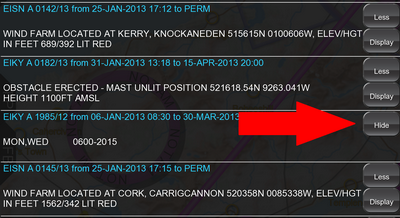 |
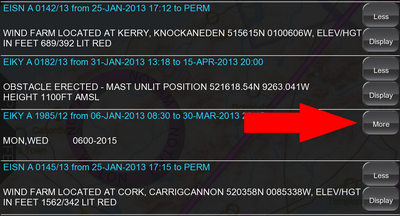
Note: If you have compressed a NOTAM to its first line by pressing the Less button then the Less button will change to Hide for a period of five seconds. If you press this button within the five second period then the NOTAM will be hidden completely. If you do not press this button in that five second period, then the button changes from Hide to More. When the NOTAM is compressed to its first line you can press this More button which will restore the NOTAM to full detail so that you can read it again.
 |
- Continue your briefing until you have reviewed all NOTAMs, hiding and compressing NOTAMs as required. The last button before the start of the actual NOTAMS themselves is called “Reset hidden NOTAMs”. On the button itself it tells you the number of NOTAMs that you have hidden. If for any reason you wish to reset the hidden NOTAMs so that all are displayed you can press this button.
- Please note that your briefing is shared across your devices via the PocketFMS Cloud. So if you have hidden a NOTAM on one device it will be hidden on your other devices too.
- Once you have reviewed all the NOTAMs in your briefing you can press the “Show NOTAMs on Map” button which is near the top of the briefing screen. This will show NOTAMs on the moving map.
- You might wish to either print your NOTAM briefing or just make an electronic copy of it. To do this tap the EasyPrint button near the start of your briefing.
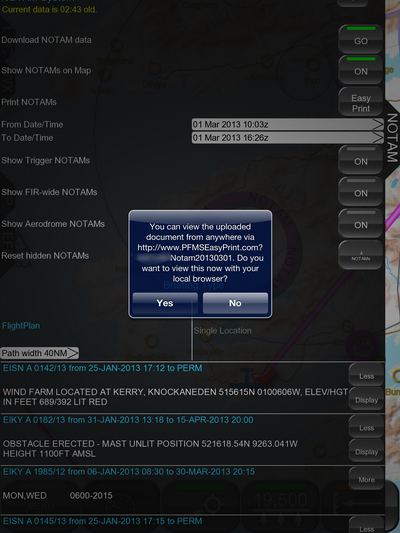
- You will be asked to create a name for your file to be printed. This name is simply used to store the file. You might like to give it a unique name so that you will not overwrite it later. In this example NOTAM20130301 is used to indicate it was a NOTAM briefing done on 1 March 2013.
 |
- You will now be given a unique URL based on the file name that you give above. You can enter this URL on any internet connected computer and print out your NOTAM briefing on that computer.
 |
If your device itself is connected to a printer you can tap Yes to open the briefing in your internet browser and print it from there instead of using another internet computer. In flight, as you approach a NOTAM which is shown on the map, you will get an information message to let you know that you are going to enter the NOTAMed area.
If you are briefing early and wish to update your briefing at a later stage, you can simply press the GO button as indicated at the start of this guide. All the NOTAMS that you previously hid will remain hidden making updating your briefing a quick and easy task. If you wish to reset the hidden NOTAMS you can press the “Reset Hidden NOTAMs” control as indicated earlier.
