VPV explained.
- The first thing we need to do is create a route. For this tutorial we will make a route that is made up of the following points:
EIWT - KLY - GTG - New Ross - EIWF. This is planned at 2,800ft AMSL.
If you need help learning how to create such a route, then please see our tutorial entitled "Create a Route".
- With a route created, we need to make sure that the Vertical Profile View is visible. If you can’t see it already on the screen, then set it to be displayed, by doing the following:
- Tap the Menu button to call it up on screen.
- Tap the Show Vrt Profile button to display the VPV.
To tidy up, tap the Menu button again - or simply do nothing for a few seconds! ;-)
- Now we have the VPV displayed, but what does it mean?
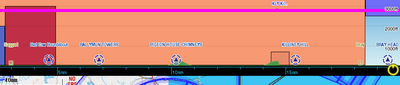 |
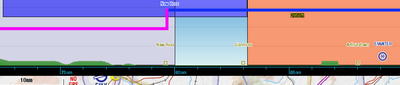
If we take a look at this screenshot, we can see part of our route. We can see some objects that are close to our route. We can see Dublin City, and Bray town. We can see the KLY NDB, and the Pigeon House Chimneys VRP.
We can see our planned altitude at 2800ft, shown by the magenta line. You'll see that there are faint black lines running across the screen, and on the right of the screen each of those are indexed with an altitude. These help to give you a reference point for the altitude of other items shown in the VPV.
Above the magenta track line we see a noting KLY(EI)-N. This is a waypoint in our flight plan and that's why it's shown at the top of the screen.
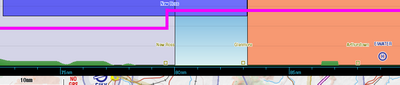
- The background in the VPV shows a blue sky, visible in the location of "Bray Head". Elsewhere we see that the sky is covered in blocks of colours. These represent airspaces that are applicable at these locations.
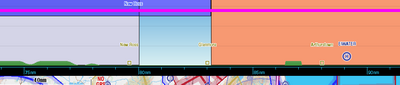 |
Looking at this one, we can see that there are three blocks of airspace. A light orange to the right, a pale grey to the left, and a dark blue to the top which partly overlaps the pale grey. The light blue in between is Class G; there's no further information for it. We can see that or track line goes through all three airspaces.
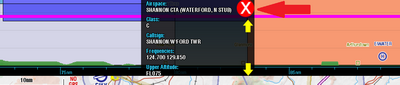
- If we want to find out what the airspace is, its simply a matter of tapping on it. If we tap on the area where the dark blue overlaps the pale grey, careful not to tap on the magenta track line itself (more than that later), we get the following pop-up.
 |
From these we can see the airspace name and class, and the callsign of the responsible ATC unit and their frequencies. We can also see that there is both up and down yellow arrow shown.
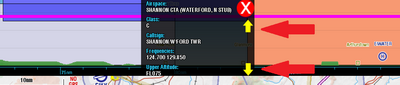 |
These indicate that there is more data above and below this point (relating to the other airspace). Scroll up or down to see the other information by dragging the text up and down. Tap the big red X to close this pop-up.
 |
- If we want to change the planned altitude for a particular leg, then this is simple to do too. Just grab the track line and drag it up or down. Youll see that the line turns blue while youre dragging it, and it also displays the altitude that will be selected when you let go.
 |
Once you let go, then your Route will be updated with the new altitude.
 |
- EasyVFR's Vertical Profile View shows all physical obstacles with their base height and top at their true altitudes. Places (whose altitude various across the place) and VRP/IFR Waypoints are the obvious exceptions.
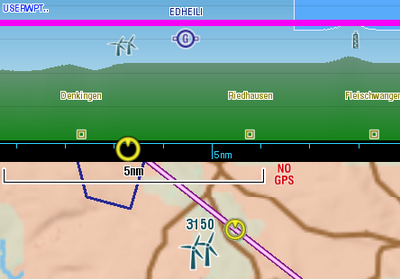 |
If we look in the example above (from a different route), we can see a glider airport EDHEILI, some wind mills and a tower that are not placed on the terrain but seem to hover above it. This is because they are a little off track, and their base altitude is higher than the terrain that's exactly under our planned route. So the physical objects are painted at their real altitudes - if the purple track line in the VPV goes over them and you fly that altitude, you should also overfly the object in real life. EasyVFR will include all obstacles that are within 5 NM on either side of your track in the VPV, to leave you some room flying a little off track.
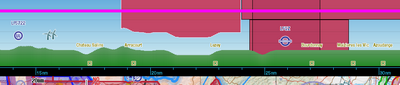 |
The red airspace in the center of the example above has its base defined not in feet AMSL (Above Mean Sea Level), but in feet AGL (Above Ground Level). The bottom contour of that airspace therefore follows the terrain elevation. The red airspace slightly to the right has that as well, but its lower limit is defined as ground / surface and therefore it sits on the terrain.
- Then there's the SyncSlider. You've probably already seen it, the yellow circle at the base of the VPV window:
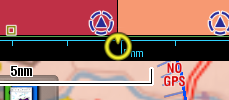 |
The SyncSlider can be dragged left or right along the distance scale, and its position corresponds with the same symbol on the Moving Map. It's the link between your Vertical Profile View and the 'helicopter view' offered by the Moving Map. Drag the SyncSlider and the corresponding position on the map will also change.
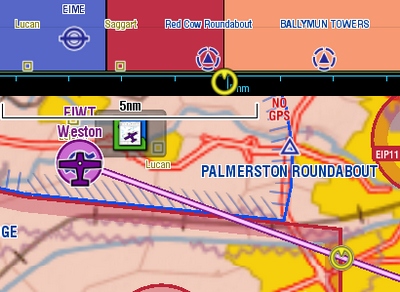 |
Rather than dragging the SyncSlider, you can also do it the other way around: drag the SyncSlider to roughly the middle of the VPV window, and then pan the VPV contents left and right. This too will move the position that's indicated on the Moving Map in accordance.
